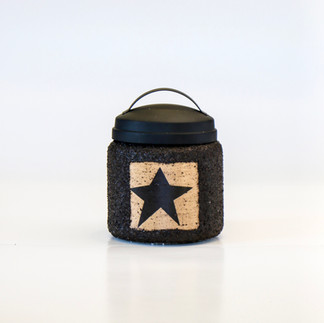
DIY primitive jar
- Crackling Wick Candles
- Apr 24, 2023
- 3 min read
Growing up I don't every remember a time when my mama didn't have a eye for anything primitive style, our log cabin home with rustic wooden floors and old beams, was decorated with old looking benches, pottery, her beautiful paintings in wooden frames, primitive greens and sunflowers, and one of her favourite pieces of furniture was a old wood stove in the corner of our kitchen. It was too old to work anymore, but was definitely a conversational piece and a beautiful sight that added to our primitive cabin! You would notice Her love for primitive antiques as soon as you stepped in the door!
Another thing I will never forget is her creative mind, she made soap, she painted, she took craft classes, she sewed, she cooked, and she wanted to pass this on to her five daughters. When we started Crackling Wick Candles it came as no surprise that she wanted to add her love of primitive things, art, creativity and something special to offer to the same.
After a lot of research, experiments, and advice we landed on these beautiful primitive looking jars to fill with a wooden wick candle.

How is it made?
It might come as a surprise that these beautiful primitive jars are actually quite simple to make considering that they are a little time consuming, but after a lot of practice you'll find you are able to create this in a couple minutes.
WHAT YOU WILL NEED:
A jar of your choice
Recycled Coffee beans (yes your heard right!)
Mod podge
Craft paint brush
Rubber bands
Glue stick (if you are adding a label)
A paper label (optional)
STEP 1
Recycled coffee beans; This seems to be the biggest shocker when we are asked "What is on the outside of the jar?" Its actually quite simple to do, all you do is brew that pot of coffee, and instead of throwing those sticky, wet coffee ground in the garbage, lay a piece of paper towel on a cookie sheet then spread the coffee grounds on top. Store in a warm, dry place. (We store ours on top of the refrigerator) Keep adding your coffee grounds until you have enough.
STEP 2
Find a jar that you like, Make sure all labels or stickers are removed.
STEP 3
If you would rather not have a label and like the look of a simpler, primitive jar, simply skip this step. This part is where you can let your creativity take over by writing your favorite quote, or printing off a beautiful picture. We print our star label one raft card stock paper.
STEP 4
Glue your label on with a glue stick and wrap two rubber bands around to keep it secure until it has dried completely (about five minutes)
STEP 5
Remove the rubber bands and pick up your paint brush. Next you will paint a think layer of mod podge over the entire jar avoiding the centre of the label. Make sure to apply around the edge of the label.
STEP 6
Next roll your jar covered with the first layer of mod podge in the coffee grounds, make sure every area is covered completly before setting aside to dry.
STEP 7
Let it set for about an hour.

STEP 8
This is the fun part, simply take your paint brush and apply a generous amount of mod podge over the entire jar, including the label. then set aside and let its dry for another hour or two.
AND THERE YOU HAVE IT.
Your very own recycled coffee ground, primitive jar.
This jar not only can be very useful, its also a beautiful piece of decoration that could be added to any primitive home, cabin, or farmhouse home!
Hope you find this information helpful and useful!
xo- Corina


I think I still remember doing those first jars in the garage at that house! Love that you are carrying this on! 🥰